Sunday, February 19, 2012

It's a Girl!!!!!

Baby arrived yesterday.....

Meghan Wardle
February 18th,
8lb. 2oz.  20 1/2" Long.


Such a precious little bundle and its absolutely adorable to watch big brother, Roy give her kisses on the cheek. Awwwww.......:-)

Thursday, February 16, 2012

Honey Peanut Butter Truffles

I made these the other day for Jay and they were a big success in the excellent feedback department. I came up with the recipe partly from memory of how our family used to make them and also from one I found online and had printed out a long time ago. (Hence the reason I don't have a link to it.)

Yummy-ness defined.

Honey Peanut Butter Coconut Truffles
1 cup Peanut Butter
1 cup Sweetened Flaked Coconut (or unsweetened. Just add a little more honey.)
1/2 cup Honey
1/3 cup dry milk powder (make sure it really is powder and put it through a sieve if you need to.)
2 cups Chocolate chips or equivalent of chocolate for dipping. Good chocolate is a must!
1-2 TB. Shortening

Mix peanut butter, coconut, and honey together. Stir in dry milk powder, mixture should be stiff enough to roll into small 1 inch balls. Place on a wax paper covered cookie sheet and put in freezer for about 1 hour. Melt chocolate chips and shortening in double boiler or in bowl placed over a pot of boiling water. (Careful not to get steam burned.) Using a toothpick or other preferred method, dip frozen truffles into chocolate and coat all sides. Place back onto waxed paper. Immediately top each with Coconut flakes or other desired garnish before chocolate hardens. Return to freezer for another hour or so. Wrapped well  (to prevent freezer burn.), these will last in the freezer for months. (Unless you eat them all within a few days. Like we did.:-)
Enjoy with a cup of tea, coffee or a tall cold glass of milk!

Tuesday, February 14, 2012

Giveaway at Simply Nurtured....


Here is a fun giveaway for anyone that is a mother, wants to be a mother or knows a mother. :-D It would make a perfect baby shower gift too! Head on over and enter if you'd like and check out the rest of the blog.

Friday, February 10, 2012

Cinnamon Rolls

Okay, I admit I have been posting a lot of recipes lately but I just can't seem to help myself. They all taste so good and this one tastes really, really good. Like "knock your socks off, eat the whole pan" kind of good. :-D

I've been craving Cinnamon Rolls for weeks but didn't ever seem to have the time to make them and finally I did and so I did. Here is my recipe adapted from The Pioneer Womans version to make it healthier and better for me since I really shouldn't eat lots of sugar right now being in the last weeks of pregnancy and all.


Cinnamon Rolls
Prep time: 2 hours
Cook time: 30 minutes
Difficulty: Easy
Servings: Alot

Ingredients:
1 quart whole milk
1 cup olive oil
1/4 c. honey
1/4 c. brown sugar
2 packages active Dry yeast
3 c. Whole Wheat Flour
5 c. All-purpose White Flour (plus 1 cup extra, separated.)
1 t. (heaping) baking Powder
1 t. (scant) baking soda
1 TB. (heaping) salt
Plenty of melted butter
2 cups brown sugar
Lots of ground cinnamon to sprinkle.

For the Icing
1/2 c. milk
1/4 c. melted butter
1/4 c. brewed coffee
1/8 t. salt
Enough powdered sugar to reach desired consistency.


Preparation instructions:
For the dough, heat the milk, olive oil, sugar and honey in a medium saucepan over medium heat to hot, don't let it boil. Set aside and cool to warm. Sprinkle yeast on top and let sit on the milk for a few minutes.
In a very large bowl, put the 3c. WW Flour and 5 c. White flour. Add yeast mixture and stir until just combined, then cover with a clean kitchen towel and set aside in a warm place for 1 hour +. After 1 hour, remove the towel and add the baking powder, baking soda, salt and the remaining 1 c. flour. Stir thoroughly to combine. Use the dough right away, or place in a large bowl and refrigerate for up to 3 days. (Note: Dough is easier to work with if its been chilled at least an hour or so beforehand.)
To assemble the rolls, remove half the dough from the pan/bowl. On a floured baking surface, roll the dough into a large rectangle, about 30 x 10 inches. The dough should be rolled very thin.
To make the filling, pour 3/4 to 1 cup of the melted butter over the surface of the dough. Use your fingers to spread the butter evenly. Generously sprinkle cinnamon and 1 cup of the brown sugar over the butter.
Now, beginning at the end farthest from you, roll the rectangle tightly towards you. Use both hands and work slowly, being careful to keep the roll tight. The filling might ooze out but that's perfectly fine. When you reach the end, pinch the seam together and flip the roll so that the roll is face down. You'll have one very long cinnamon roll log. With a sharp knife, make 1 inch slices. Pour a couple tablespoons of melted butter into the bottom of disposable cake pans and swirl to coat. Place the sliced rolls in the pans, being careful not to overcrowd.
Repeat the rolling/buttering/sugaring process with the other half of the dough and more pans.
Preheat the oven to 375'F.
Cover all the pans with plastic wrap and set aside to rise for at least 20 minutes before baking. Remove the plastic wrap and bake for 18 to 25 minutes until golden brown. Don't let the rolls become overly brown.
While the rolls are baking, make the icing; In a large bowl, whisk together the milk, butter, coffee, salt and powdered sugar. Whisk until very smooth. Taste and add in more sugar, butter or coffee as needed until icing reaches desired consistency. The icing should be somewhat thick but still very pourable.
Remove pans from the oven. Immediately drizzle icing over the top. Be sure to cover the top thoroughly. As they sit the rolls will absorb some of the icings moisture and flavor.
Tip: Since this recipe makes a lot of cinnamon rolls, I placed some in disposable cake pans, covered in plastic wrap in the freezer to pull out, thaw and bake later. Just make sure to cover the rolls thoroughly so they don't freezer burn.
Enjoy!

Wednesday, February 8, 2012

Brain malfunctioning....

...or absent mindedness or whatever its called is funny but sometimes embarrassing. At least when there is someone else around to observe said malfunction.

Picture this, a drive up coffee house, namely Dutch Bros. where my husband and I frequent frequently (:-D), I'm on a coffee run for Jay and my brother since they are working and I'm running errands and so I'm getting them coffee since I'm such a nice wife and sister. :-D Anyways, I pull into the drive-thru lane behind a little car to wait my turn and trying to be extra efficient I decide to double check my shopping list while waiting (The little car was taking a long time......). So, I'm carefully checking it and going over in my head what each item on the list is for when I look up and see the Barista's both peeking out the window at me grinning and the little car is nowhere in sight! Yup, it was not only done but it wasn't even in the parking lot anymore! *facepalm* How long I'd been studying my list I'm not entirely sure but it was long enough for the baristas to get a good laugh and me to feel silly. They said they were wondering when I was going to notice it was my turn......Oh well! At least there wasn't anyone in line after me and I have to admit it was pretty funny, embarrassing but funny! :-)

Today I did start to wonder though if whoever it is that says "for every child you have you lose 10% of your brain capacity" isn't entirely off base when I tried to put the carton of 5 dozen eggs in the garbage can and the egg shells into the fridge. :-/

Well, life is never dull that's for sure!

Cheerio!

Tuesday, February 7, 2012

Tea and Toast, anyone?

So, our oven element decided to have a k-nips (sp?) and go out on Sunday. I had turned it on to pre-heat prior to putting in potatoes for baked potatoes for dinner and Jay and I were sitting in the livingroom when we heard a loud pop from the kitchen. Going in to investigate we discovered the bottom element in the oven had a huge glowing bright orange spot in it and it was hissing and crackling.....so, no baked potatoes for dinner and no baking, so, no making bread and we had just finished the last loaf that morning....hmmmm.....

Anyways, I've made English Muffins quite a few times (just not in the last 3-4 years) and decided they would be a good substitute for loaves of bread until the oven is fixed ("come on landlord".......*tapping foot* :-D).

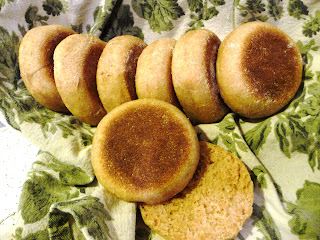
They turned out just as hoped and were quite a hit with Jay and the wee little man. I shall enjoy some lightly toasted and spread with honey with a cup of tea at 4 o'clock I imagine. :-)


Whole Wheat English Muffins

Prep time: 2 hours
Cook time: 10-15 minutes
Servings: 24-30

Ingredients:
- 1/4 c. boiling hot water
- 1/4 c. cold water
- 1 TB. active dry yeast
- 4 c. Whole Wheat Flour, plus more as needed.
- 2 c. White Flour
- 1 t. salt
- 2 c. Milk
- 6 TB. Oil
- 2 TB. Honey
- 2 Eggs

Directions:
-Mix hot and cold water and sprinkle yeast on it. Let stand for 10-15 minutes.
-In a large bowl, mix flours and salt.
-In another bowl, mix milk, oil and honey. Add egg and stir until well blended. Stir in yeast mixture.
-Add liquid to about half of the dry ingredients and mix well, with a stand mixer or wooden spoon. Mix in remaining dry ingredients. Dough will be soft and somewhat sticky.
-Turn dough out on a liberally floured work surface and knead for several minutes, sprinkling flour on it if needed to make it workable.
-Put dough in an oiled bowl, cover with plastic wrap or a damp towel and let rise in a warm place until doubled in size. Rising time will depend on temperature but allow about an hour.
-Turn risen dough out onto a work surface that has been liberally dusted with flour or cornmeal and pat or roll to about 1/2" thick. Cut into approximately 3 inch rounds with a cookie cutter, tin can or jar lid. If you wish, combine the scraps of dough into more muffins, handling as little as possible. Cover the muffins with a towel and let rise for 25-30 minutes.
-Heat a cast iron griddle or large skillet over medium-low heat. Using a spatula, carefully transfer muffins to hot griddle, cooking about 5 minutes. Turn the muffins gently so as not to deflate them too much. Outsides should be golden brown and crusty, insides should be soft but not gooey. Sacrifice a muffin or two to check for done-ness.
-Remove to cooling rack as they finish cooking. Cook the rest in batches.

Tip: English muffins are traditionally split open with a fork, rather than cut, and then toasted, but they will be good however you do it.

Variations of this recipe:
Add cinnamon, raisins and a little extra honey. Toasted and then buttered they make a great breakfast meal.

Chocolate chips- I've tried it and if I remember right, they were quite tasty. :-)

Another idea for this recipe: Mini Pizza's


Whole Wheat English Muffins Recipe adapted from this one.


Enjoy!